


Google AdSense Account Setup & Approval Guide for Beginners : Everything You Need to Know

Table Of Contents
1: Introduction, Basics, and Why AdSense Matters
2: Step-by-Step Account Creation
3: After Approval – Setting Up Ads and Getting Your First Earnings
4: AdSense Policies, Common Mistakes & Advanced Optimization
5: AdSense for YouTube & Apps + Payment Setup
6: Troubleshooting, Scaling & FAQs
1: Introduction, Basics, and Why AdSense Matters
📚 What is Google AdSense?
At its core, Google AdSense is an advertising program run by Google
that allows website owners, YouTubers, and app developers to display ads on
their platforms. Advertisers pay Google to show their ads, and Google shares
a portion of that revenue with you, the publisher.
Here’s a simple analogy:
-
Imagine your website is a billboard.
-
Advertisers want to put their ads on that billboard.
-
Google acts as the middleman, handling the payments, ad selection,
and tracking.
-
You, as the site owner, get paid each time someone views or clicks those
ads.
🔑 Key Points About AdSense:
-
It’s free to join.
-
Works for websites, YouTube, and apps.
-
Pays you via Cost Per Click (CPC) or
Cost Per Mille (CPM) (per thousand views).
-
Supports multiple ad formats (text, image, video, native ads, responsive
ads).
-
Provides detailed analytics so you know how much you earn.
💡 Why Choose AdSense? (Advantages)
Before jumping into account creation, let’s look at
why millions of content creators use AdSense:
-
Passive Income Stream 🛋️
-
Once ads are placed, they earn you money automatically. You don’t have
to actively sell anything.
-
Global Trust 🌍
-
Backed by Google, so advertisers trust it, and publishers know payments
are reliable.
-
Diverse Advertisers 📊
-
You don’t have to go out and find advertisers. Google does all the
matchmaking for you.
-
Flexible Ad Types 🎨
-
You can choose from banners, in-article ads, matched content, auto ads,
and more.
-
Scales with Your Traffic 📈
-
The more visitors you get, the more potential revenue.
-
Beginner-Friendly Yet Powerful 🚀
-
Even beginners with a simple blog can apply, but advanced users can
optimize placement for maximum profits.
⚖️ AdSense Eligibility: Who Can Apply?
Not everyone can just jump in and get approved. Google has
strict eligibility requirements, which is why many beginners get
rejected.
Here’s what you need to qualify:
-
You must be 18 years or older.
-
Minors can’t apply (but can use a parent/guardian account).
-
You need a website, YouTube channel, or app.
-
For websites: The content must be original, valuable, and follow
Google’s policies.
-
For YouTube: You need to meet the
YouTube Partner Program requirements (1,000 subscribers + 4,000
watch hours in the past 12 months).
-
For apps: They must comply with Google Play policies.
-
Content Quality.
-
No plagiarized articles, adult content, or copyrighted material.
-
Well-written, clear, and useful content is a must.
-
Domain Ownership.
-
You must own the website domain (free subdomains like “.blogspot” or
“.wordpress” often get rejected).
-
Traffic and Structure.
-
While Google doesn’t state a minimum traffic requirement, having
at least 20–30 quality posts and some daily visitors improves
your chances.
⚠️ Pro Tip: Before applying, check your site against Google’s
Publisher Policies. Many beginners skip this and get rejected for
reasons they could have easily avoided.
🔍 SEO Tip #1: Prepare Your Site Before Applying
Want to increase your chances of approval? Make sure your site is
SEO-friendly and professional.
Here’s a quick checklist before hitting that “Sign Up” button:
✅ Custom domain (e.g., www.yourwebsite.com).
✅ At least 20 well-written, unique blog posts.
✅ Clear navigation menu (Home, About, Contact, Privacy Policy).
✅ Fast loading speed (use Google PageSpeed Insights to test).
✅ Mobile-friendly design (AdSense rejects sites that don’t work well on
mobile).
Think of it this way: if your site looks like a legit business, Google will treat it as one.
2: Step-by-Step Account Creation
🛠️ Step 1: Visit the Official AdSense Website TO Sign Up
The only safe way to apply is through the official link:
- Go to the sign-up page. https://www.google.com/adsense/signup
- Enter your website url (exclude “http/s” part of the url) and google account. Click “save and continue”.
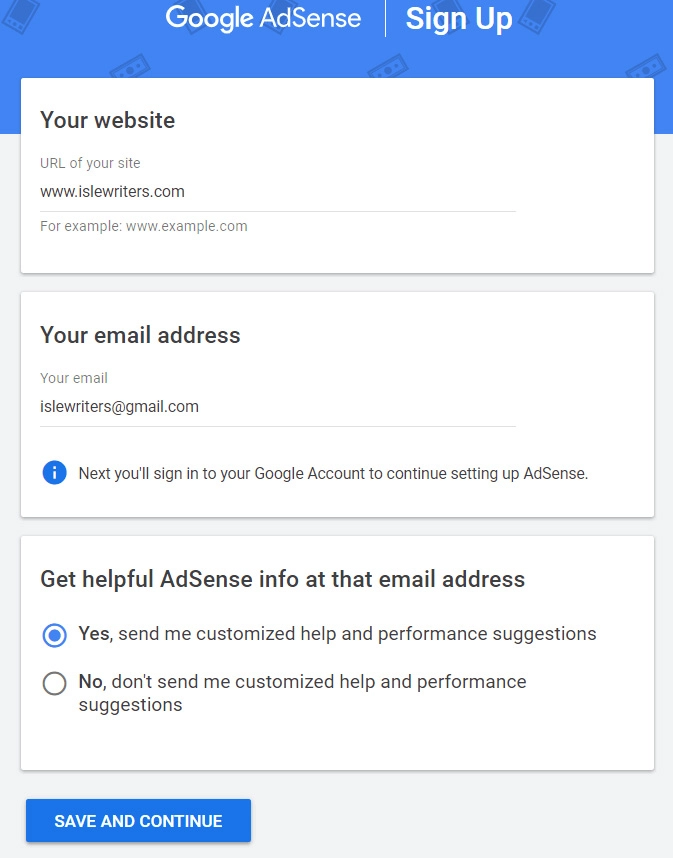
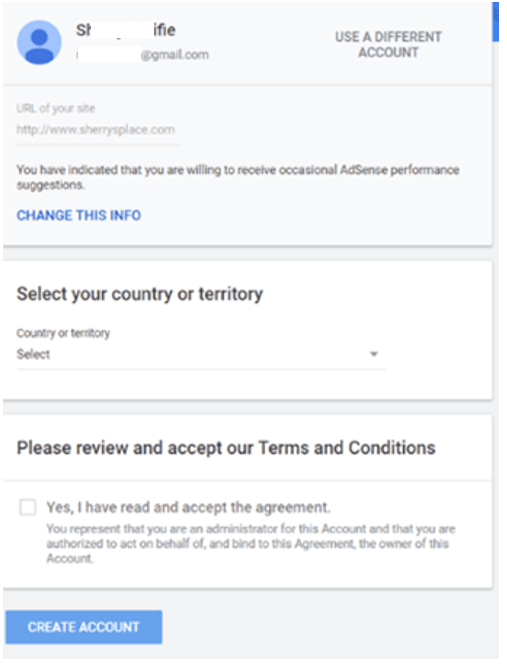
- Choose your country or territory, agree to the terms and conditions, and then click ‘Create Account.’ Congratulations—you’re now signed in to your brand-new Google AdSense account."
Step 2: Fill in Payment Address Details and Wait For Approval
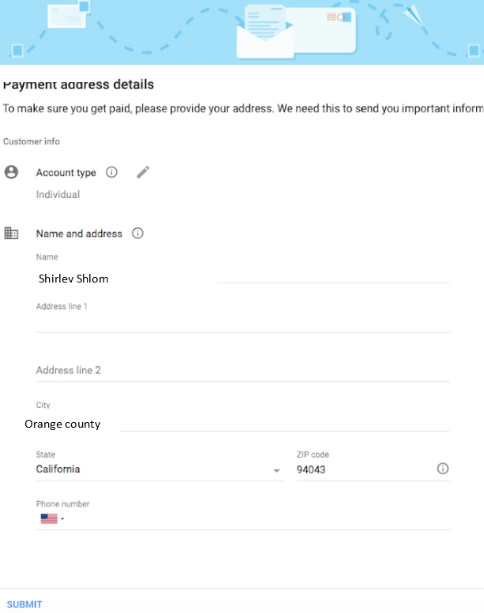
- When you click submit, you will see this message:
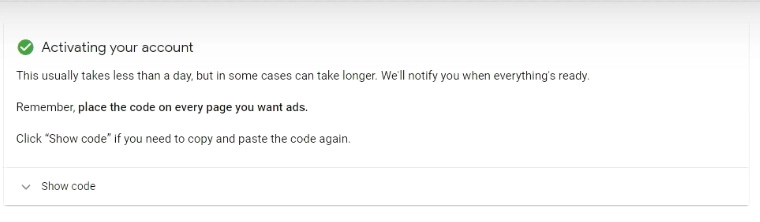 Once the account has been approved, you’ll be able to access the
grayed-out tabs.
Once the account has been approved, you’ll be able to access the
grayed-out tabs.
Step 3: Provide Tax Information
No matter where you live, Google requires all AdSense publishers—both U.S. and non-U.S.—to provide tax information before getting paid. Don’t worry, it’s simpler than it sounds.
👉 If you’re an individual outside the U.S., you’ll need to fill out
Form W-8BEN.
👉 If you’re registering as a company, you’ll complete
Form W-8BEN-E.
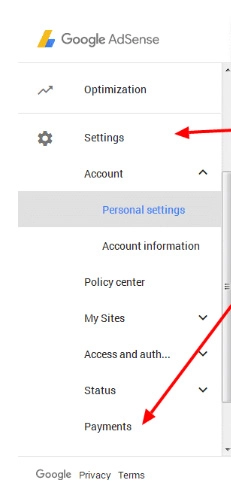
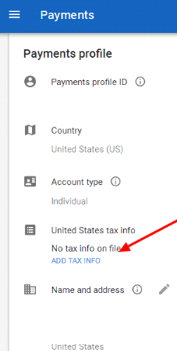
To add your tax information, log in to your Google AdSense account, navigate to Settings, then select Payments. From there, click on Manage Settings to update and submit your tax details.
- Click “Add tax info”.
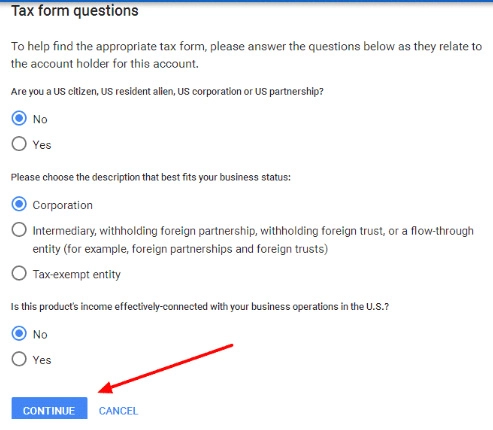
- You will be prompted with a series of tax form questions. Simply choose the options highlighted with blue dots in the image below, then click ‘Continue’ to proceed.
- Fill the four-part form that loads.
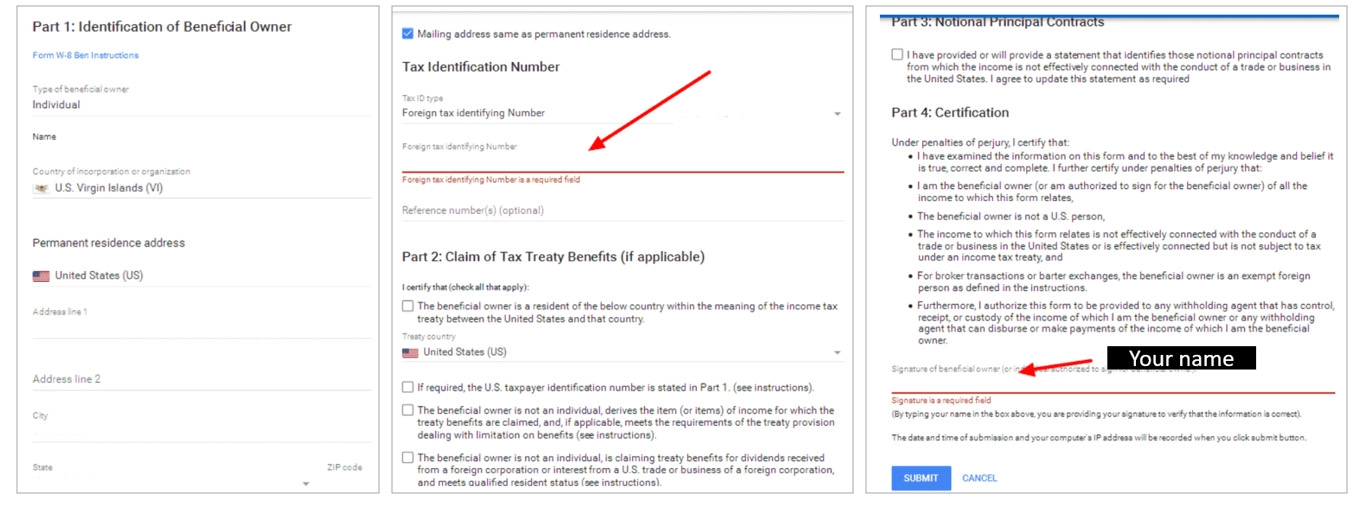
- Once done, click “submit”.
🛠️ Step 2: Sign in With Your Google Account
AdSense is part of Google’s ecosystem, so you’ll need a
Gmail account.
👉 If you don’t have one, create a Gmail first:
https://accounts.google.com/signup.
When you click Get Started, Google will ask you to
sign in.
🖼️ Example Screenshot:
-
A white login box with Google logo.

-
Fields for Email / Phone and Password.

🔑 Tip: Always use the Gmail connected to your YouTube channel or
website. Mixing accounts can cause confusion later.
🛠️ Step 3: Enter Your Website (or YouTube/App)
Google now asks:
“What’s your site’s URL?”
👉 Enter your full website domain (e.g.,
https://www.myawesomeblog.com).
⚠️ Important Notes:
-
Don’t add subpages (e.g., /blog or /about). Use the
main homepage URL.
-
If applying via YouTube, you’ll link AdSense through YouTube
Studio (we’ll cover this in Part 5).
- If applying via apps, you’ll link AdSense with your developer account.
🛠️ Step 4: Choose Your Country/Region
Select your country of residence. This determines:
-
The currency of your payments.
-
The tax forms you’ll need to submit later.
-
The support policies that apply to you.
⚠️ Warning: Never fake your location. Payments may be blocked if
your details don’t match your ID and bank.
🛠️ Step 5: Accept the Terms and Conditions
Before moving on, Google will ask you to accept its
Publisher Policies.
✅ Read carefully (at least skim) because violations here are why 80% of
people get banned later.
The big checkbox says:
“I have read and agree to the AdSense Terms and Conditions.”
Click Yes, then Create Account.
🛠️ Step 6: Complete Payment & Personal Information
Now you’ll see a dashboard asking for:
-
Name (must match your bank account).
-
Address (where Google will mail your PIN).
-
Phone number (for verification).
Form with fields:
-
Name (First + Last).
-
Address Line 1, Address Line 2, City, Postal Code.
-
Country (auto-filled).
-
Phone (with SMS verification option).
🔑 Pro Tip: Use your real legal name. If your name on AdSense
doesn’t match your bank account, you’ll never receive payments.
🛠️ Step 7: Verify Your Phone Number
Google sends you a 6-digit code via SMS. Enter it into the
verification box.
If SMS doesn’t work, you can request a voice call.
🛠️ Step 8: Connect Your Site with AdSense Code
Now comes the fun part: Google gives you a snippet of HTML code. You
must place this code on your website so Google can verify ownership.
Here’s what the code looks like (example):
<!-- Google AdSense Verification Code -->
<script async
src="https://pagead2.googlesyndication.com/pagead/js/adsbygoogle.js"></script>
<meta name="google-adsense-account"
content="ca-pub-1234567890123456">
👉 Steps to add this code:
-
Copy the code.
-
Open your website’s HTML editor (for WordPress, Blogger, or custom
site).
-
Paste the code inside the <head> section, just before
</head>.
🔧 For WordPress users:
-
Go to Appearance → Theme Editor → header.php.
-
Paste the code before </head>.
-
Or use a plugin like Insert Headers and Footers.
🔧 For Blogger users:
-
Go to Theme → Edit HTML.
-
Find </head>.
-
Paste the code above it.
An HTML editor with highlighted <head> tag and the AdSense code
pasted in.

🛠️ Step 9: Request Review
Once the code is in place, go back to AdSense and click
“I’ve placed the code” → Done → Submit for Review.
At this point, Google will:
-
Crawl your site.
-
Check content quality.
-
Verify ownership.
-
Ensure you comply with policies.
This review can take 24 hours to 2 weeks (sometimes longer).
⚡ Common Mistakes That Get You Rejected
While waiting, here are the top mistakes beginners make:
-
Thin Content (e.g., 2–3 posts only).
-
Google wants at least 20–30 quality articles.
-
Copyrighted Material (pirated movies, copied articles).
-
Automatic rejection.
-
No Essential Pages (About, Contact, Privacy Policy).
-
Google sees this as unprofessional.
-
Slow, messy site design.
-
If your site looks broken, Google won’t approve it.
🔍 SEO Tip #2: Optimize Your Website During Review
While waiting for approval, strengthen your SEO to improve your
chances.
✅ Use proper headings (H1, H2, H3).
✅ Compress images for faster loading.
✅ Avoid keyword stuffing—write naturally.
✅ Make your Privacy Policy and Terms pages
visible in the footer.
Think of Google reviewers like strict teachers. The cleaner your
site looks, the better your grade.
🎯 Summary of Part 2
By now, you know exactly how to:
-
Start the AdSense application.
-
Enter your details.
-
Place the AdSense verification code.
-
Submit your site for review.
The hardest part now? Waiting for approval. But don’t worry, in the
next part we’ll cover:
3: After Approval – Setting Up Ads and Getting Your First Earnings
🎉 Congratulations – You’re Approved!
So, the email arrives:
📧 Subject Line: “Your site is ready to show AdSense ads.”
That means:
-
Your website passed Google’s review.
-
Ads can now be displayed.
-
You’re officially a Google Publisher! 🚀
But hold up—don’t just throw ads everywhere. Setting them up properly is
key to earning more while keeping your visitors happy.
🖥️ Step 1: Understanding the AdSense Dashboard
When you log in, the dashboard looks something like this (white background, blue highlights):

Think of the dashboard as your control center:
-
Ads → Where you create and manage ad units.
-
Sites → Shows which websites are linked to your account.
-
Reports → Your earnings and traffic insights.
-
Payments → Where you set up bank details and receive money.
🛠️ Step 2: Choosing Between Auto Ads vs. Manual Ads
AdSense gives you two options for displaying ads:
1. Auto Ads (Beginner-Friendly)
-
Google automatically places ads on your site.
-
Uses AI to decide best positions.
-
Great for beginners who don’t want to mess with code.
👉 To activate:
-
Go to Ads → Overview → Get Started with Auto Ads.
-
Copy the provided code.
-
Place it inside the <head> section of your website (same as
verification).
🔑 Pro Tip: Use Auto Ads if you’re new, but keep an eye on
placement—sometimes Google adds too many ads.
2. Manual Ads (Advanced Control)
-
You decide exactly where ads appear.
-
Great for customizing user experience.
-
Requires copying and pasting ad unit codes into your site.
👉 To create a manual ad:
-
Go to Ads → By ad unit → Display ads.
-
Choose size (e.g., 300x250, 728x90, responsive).
-
Name your ad unit (e.g., Sidebar Banner).
-
Click Create.
-
Copy the HTML code provided.
Here’s what a responsive ad code looks like:
<!-- Google AdSense Responsive Ad -->
<ins class="adsbygoogle"
style="display:block"
data-ad-client="ca-pub-1234567890123456"
data-ad-slot="9876543210"
data-ad-format="auto"
data-full-width-responsive="true"></ins>
<script>
(adsbygoogle = window.adsbygoogle || []).push({});
</script>
📌 Where to place this code:
-
Sidebar → Great for visibility.
-
Within Articles → Insert after the first 2–3 paragraphs.
-
Header/Footer → Works for wide banner ads.
🛠️ Step 3: Testing Ad Placement
You don’t want to annoy visitors by spamming ads. Instead, follow the
3x Rule:
👉 Maximum 3 ads per page view for best user experience.
✅ Best Placements:
-
Header (728x90 leaderboard ad) – catches attention but not too
intrusive.
-
In-article (responsive ad) – blends with content.
-
Sidebar (300x250 rectangle ad) – steady earner.
❌ Bad Placements:
-
Too many ads “above the fold.”
-
Ads covering text.
-
Pop-ups or auto-playing video ads (policy violations).
🛠️ Step 4: Wait for Ads to Appear
After placing the code, it can take 15 minutes to 24 hours for ads
to start showing.
At first, you might see blank spaces—this is normal while Google
scans your site for relevant ads.
🛠️ Step 5: First Earnings
💵 AdSense revenue depends on two main models:
-
CPC (Cost Per Click): You earn money each time someone clicks.
-
CPM (Cost Per Mille): You earn per 1,000 ad impressions
(views).
For example:
-
If CPC = $0.30 and 100 people click → You earn $30.
-
If CPM = $2 and you get 10,000 views → You earn $20.
👉 The amount varies by niche, country, and traffic quality. Finance and
technology niches usually pay the highest CPC.
🛠️ Step 6: Using Reports to Track Performance
In the dashboard, go to Reports.
Here you’ll see:
-
Estimated Earnings – today, yesterday, last 7 days.
-
Page RPM (Revenue per 1000 impressions).
-
Top pages (which blog posts earn most).
-
Click-through rate (CTR).
👉 This helps you figure out which content attracts profitable ads, so you
can create more of that type of content.
🔍
SEO Tip #3: Place Ads Strategically for Both Earnings & Rankings
Many bloggers make the mistake of flooding their pages with ads. This hurts
SEO because:
-
Google Search penalizes sites with too many intrusive ads.
-
Visitors leave quickly (higher bounce rate).
✅ Smart SEO-friendly ad placement:
-
1 responsive ad above the fold.
-
1 in-content ad after 2nd or 3rd paragraph.
-
1 sidebar ad.
That’s it. Clean, simple, profitable.
🎯 Summary of Part 3
By now you know:
-
What happens after approval.
-
Difference between Auto Ads and Manual Ads.
-
How to generate and place ad codes.
-
Best practices for ad placement.
-
How to track earnings with reports.
4: AdSense Policies, Common Mistakes & Advanced Optimization
⚖️ AdSense Policies: The Golden Rulebook
Google AdSense is one of the strictest ad networks in the world. They don’t
play around—one wrong move and your account could be
suspended or permanently banned.
Here’s the official rulebook in plain English:
🚫 Content Violations
Your site cannot have:
-
Adult or sexually explicit content.
-
Violent or hateful material.
-
Illegal content (drugs, pirated movies, hacking tutorials).
-
Copyrighted content you don’t own.
-
Misinformation, scams, or clickbait traps.
🚫 Invalid Clicks
-
You can’t click your own ads (ever).
-
You can’t ask friends or family to click ads.
-
You can’t incentivize clicks (e.g., “Click here to support me!”).
Google has advanced algorithms to detect fake traffic. If you try to cheat,
you’ll be banned instantly.
🚫 Ad Placement Violations
-
Ads must not cover content.
-
No misleading labels like “Download here” on ads.
-
Ads must not be placed inside pop-ups or software.
🧨 Common Mistakes Beginners Make
-
Applying Too Early
-
Submitting a half-finished site with only 3–4 posts.
-
Ignoring Policy Pages
-
Missing “Privacy Policy,” “About,” and “Contact” pages.
-
Using Free Subdomains
-
myblog.blogspot.com is less likely to get approved than myblog.com.
-
Ad Overload
-
Too many ads frustrate visitors and hurt SEO.
-
Neglecting Mobile
-
Ads that don’t display properly on phones = rejection.
🧑💻 Advanced Ad Placement Examples (HTML + WordPress)
Here are some ready-to-use snippets for better monetization:
Example 1: In-Article Ad (after first 2 paragraphs)
<p>This is the first paragraph of your blog post...</p>
<p>This is the second paragraph of your blog post...</p>
<!-- Google AdSense In-Article Ad -->
<ins class="adsbygoogle"
style="display:block; text-align:center;"
data-ad-layout="in-article"
data-ad-format="fluid"
data-ad-client="ca-pub-1234567890123456"
data-ad-slot="1234567890"></ins>
<script>
(adsbygoogle =
window.adsbygoogle || []).push({});
</script>
✅ Best for: Articles, tutorials, guides.
✅ Reason: Blends with content naturally, doesn’t annoy users.
Example 2: Sidebar Ad (Sticky Widget in WordPress)
If you want a sticky sidebar ad that stays visible while users
scroll:
<div style="position:sticky; top:10px;">
<!-- Google
AdSense Sidebar Ad -->
<ins
class="adsbygoogle"
style="display:block"
data-ad-client="ca-pub-1234567890123456"
data-ad-slot="9876543210"
data-ad-format="auto"></ins>
<script>
(adsbygoogle = window.adsbygoogle || []).push({});
</script>
</div>
✅ Best for: Blogs with long sidebars.
✅ Reason: Higher visibility = higher CTR.
Example 3: Header Banner (Leaderboard Ad)
Place this right below your navigation bar:
<!-- Google AdSense Header Leaderboard -->
<ins class="adsbygoogle"
style="display:block"
data-ad-client="ca-pub-1234567890123456"
data-ad-slot="135791113"
data-ad-format="horizontal"></ins>
<script>
(adsbygoogle = window.adsbygoogle || []).push({});
</script>
✅ Best for: Getting attention without being intrusive.
🔍 SEO Tip #4: Balance Ads and Content
Google Search hates websites overloaded with ads. Here’s how to stay
safe:
✅ Maintain at least 70% content – 30% ads on every page.
✅ Use responsive ads so they adapt to mobile.
✅ Keep ads above the fold minimal (1 is enough).
✅ Always have clean navigation and fast loading times.
🎯 Advanced Optimization Techniques
If you want to
boost CPC (Cost Per Click) and CTR (Click-Through Rate):
-
Target High-CPC Keywords
-
Example niches: Finance, insurance, software, health.
-
Use tools like Ahrefs or Google Keyword Planner.
-
Geography Matters
-
U.S., Canada, UK, and Australia traffic = higher CPC.
-
Example: A click from India may earn $0.05, but from the U.S. it could
be $1–$5.
-
Experiment with Colors & Sizes
-
Blend ads into your site design (don’t make them look like obvious
ads).
-
Use responsive ads for flexibility.
-
Use Heatmaps (like Hotjar)
-
See where users click most. Place ads nearby.
-
Optimize Page Speed
-
Faster pages = more impressions.
- Use caching plugins and compress images.
🎯 Summary of Part 4
At this stage, you’ve learned:
-
The critical AdSense policies.
-
The mistakes that get people rejected or banned.
-
How to use advanced ad placement with HTML/WordPress.
-
Optimization techniques for higher CPC and CTR.
5: AdSense for YouTube & Apps + Payment Setup
🎥 AdSense for YouTube
AdSense isn’t just for websites. If you’re a YouTuber, this is how you
actually get paid for your videos.
🛠️ Step 1: Meet YouTube Partner Program Requirements
Before connecting AdSense, you need to qualify:
-
✅ At least 1,000 subscribers.
-
✅ At least 4,000 valid public watch hours in the past 12
months.
-
✅ No community guideline strikes.
👉 Once you qualify, you can apply for the
YouTube Partner Program (YPP).
🛠️ Step 2: Link YouTube to AdSense
-
Go to YouTube Studio → Monetization.
-
Click “Start” under Sign up for Google AdSense.
-
Sign in with the same Gmail account you used for AdSense.
-
Select your existing AdSense account (or create one if new).
🛠️ Step 3: Set Monetization Preferences
You can choose the type of ads that show on your videos:
-
Display ads (desktop).
-
Overlay ads.
-
Skippable video ads.
-
Non-skippable video ads (higher CPM but can annoy viewers).
🔑 Pro Tip: Skippable ads usually strike a balance between revenue
and viewer satisfaction.
🛠️ Step 4: Wait for YouTube Review
Just like websites, YouTube reviews your channel for policy compliance.
This can take a few days to a few weeks.
Once approved, ads will start running automatically on eligible videos.
💡 YouTube SEO Tip: Longer videos (8+ minutes) allow
mid-roll ads, which increase revenue.
📱 AdSense for Apps
If you’re an app developer, you can use Google AdMob (part of
AdSense for apps).
🛠️ How It Works:
-
Create an AdMob account (linked to AdSense).
-
Add your app (from Google Play or App Store).
-
Generate ad units (banners, interstitials, rewarded video
ads).
-
Insert the code or SDK into your app.
📌 Example Ad Types in Apps:
-
Banner ads → Small strip at top/bottom.
-
Interstitial ads → Full-screen ads between activities.
-
Rewarded ads → Users watch an ad to get in-game currency (very
profitable).
💳 AdSense Payment Setup
Now for the part everyone cares about: getting paid.
🛠️ Step 1: Payment Threshold
Google won’t pay you until you earn at least $100 (or equivalent in
your currency).
For example:
-
Earn $50 in Month 1 → Not paid yet.
-
Earn $60 in Month 2 → Total $110 → Paid around the 21st of the month.
🛠️ Step 2: Verify Identity (KYC)
Google requires:
-
A government-issued ID (passport, driver’s license, or national
ID).
- A valid address (Google mails a PIN to confirm).
🛠️ Step 3: Enter Payment Method
Go to Payments → Manage Payment Methods.
Available options (depends on country):
-
✅ Bank Transfer (Wire transfer – most common).
-
✅ Check (less common, slower).
-
✅ Western Union (phased out in many countries).
🔑 Best Choice: Direct bank transfer – fastest and
safest.
🛠️ Step 4: Tax Forms (Important!)
Google requires tax information:
-
U.S. creators → W-9 form.
-
Non-U.S. creators → W-8BEN form.
This ensures proper tax withholding. If you skip this, Google may
withhold up to 30% of your earnings.
🛠️ Step 5: PIN Verification (Address Confirmation)
Google mails a physical letter with a 6-digit PIN to your
address.
-
It usually arrives within 2–4 weeks.
-
Enter the PIN in your AdSense account.
-
Without PIN, payments are put on hold.
💵 How and When You Get Paid
-
Payments are issued on the 21st of each month (if you reached
$100).
-
Processing time: 2–5 business days (for bank transfers).
-
You’ll receive a payment confirmation email.
Example Timeline:
-
Earnings in January → Added to balance in February → Paid around Feb
21st.
🔍 SEO Tip #5: Monetization Beyond Ads
Ads are great, but smart creators
combine AdSense with other income streams:
-
Affiliate marketing → Promote products for commissions.
-
Sponsored posts/videos → Brands pay for exposure.
-
Digital products → E-books, courses, premium content.
👉 This diversifies your income and protects you if AdSense has a bad
month.
🎯 Summary of Part 5
You now know how to:
-
Connect YouTube with AdSense.
-
Monetize apps using AdMob.
-
Set up payments, tax forms, and PIN verification.
-
Understand the $100 payment threshold.
-
Combine AdSense with other strategies for stable income.
6: Troubleshooting, Scaling & FAQs
⚠️ Troubleshooting AdSense Issues
Even if you follow every step, things can still go wrong. Let’s tackle the
most common problems and how to fix them.
❌ Issue 1: “Your Site Isn’t Ready to Show Ads”
This usually happens when:
-
The site is too new (less than 1–2 months old).
-
It has thin content (fewer than 15–20 posts).
-
It has copied/plagiarized content.
-
It’s missing a Privacy Policy / About / Contact page.
✅ Fix:
-
Add at least 20+ quality posts (700–1500 words each).
-
Ensure original, unique content (use plagiarism checkers).
-
Add essential pages: Privacy Policy, Disclaimer, Contact.
-
Remove “Under Construction” or empty pages.
❌ Issue 2: Low CPC (Cost Per Click)
You’re getting clicks but making cents… why?
-
Your niche has low-paying advertisers.
-
Audience is from countries with lower ad spend.
✅ Fix:
-
Target high CPC niches (finance, insurance, software, health).
-
Write articles optimized for U.S., U.K., Canada traffic.
-
Use long-tail keywords with commercial intent.
❌ Issue 3: Ads Not Showing
Possible reasons:
-
You didn’t place the code correctly.
-
Ad blockers are hiding ads.
-
Google is still reviewing your site.
✅ Fix:
-
Double-check code placement inside <head> or before
</body>.
-
Wait 24–48 hours after approval.
-
Test with another browser (without ad-block).
📌 Example: Proper Ad Code Placement
<!DOCTYPE html>
<html lang="en">
<head>
<meta
charset="UTF-8">
<title>My
Blog</title>
<!-- Google AdSense Code
-->
<script async
src="https://pagead2.googlesyndication.com/pagead/js/adsbygoogle.js"></script>
<script>
(adsbygoogle = window.adsbygoogle || []).push({
google_ad_client: "ca-pub-1234567890123456",
enable_page_level_ads: true
});
</script>
</head>
<body>
<h1>Welcome to
My Blog!</h1>
<p>Here’s some
awesome content...</p>
</body>
</html>
❌ Issue 4: Policy Violations
Google is strict. Common violations:
-
Adult, violent, or copyrighted content.
-
Click fraud (don’t click your own ads!).
-
Misleading placements (ads hidden in navigation).
✅ Fix:
-
Always review Google AdSense Policies.
-
Place ads clearly and naturally.
-
Never encourage people to “click the ads.”
📈 Scaling AdSense Revenue
Once you’re approved and running ads, how do you
grow your income?
🔑 Step 1: Increase Traffic with SEO
-
Use long-tail keywords: Example: instead of “travel tips,” use
“budget travel tips for Europe 2025.”
-
Write pillar posts (3,000+ words guides).
-
Interlink between posts to keep users engaged.
🔍 SEO Tools that help:
-
Google Keyword Planner.
-
Ahrefs / SEMrush.
-
Ubersuggest.
🔑 Step 2: Optimize Ad Placements
-
Above the fold ads (first visible area) = higher CTR.
-
In-content ads (between paragraphs) = good engagement.
-
Responsive ads = adjust automatically to devices.
📌 Example Layout:
-
Top banner below header.
-
One in-article ad after 2nd paragraph.
-
One sidebar ad.
🔑 Step 3: Experiment with Ad Types
-
Display ads (classic).
-
In-feed ads (integrated with blog posts).
-
Matched content (recommendations, higher engagement).
👉 Use Auto Ads if you want Google AI to optimize placements for
you.
🔑 Step 4: Diversify Income
Relying 100% on AdSense is risky. Combine it with:
-
Affiliate marketing (Amazon Associates, CJ Affiliate).
-
Sponsored posts.
-
Digital products (e-books, courses).
❓ Frequently Asked Questions (FAQs)
1. How long does AdSense approval take?
-
Usually 2–14 days, but sometimes up to 1 month.
2. Can I use AdSense with free Blogger or WordPress.com?
-
Blogger: ✅ Yes.
-
WordPress.com: ❌ No (you need self-hosted WordPress.org).
3. Can I have more than one AdSense account?
-
❌ No. Google only allows one account per individual.
4. What is the minimum payout?
-
$100 (USD) or local equivalent.
5. Can I use AdSense and affiliate marketing together?
-
✅ Yes, as long as you follow policies. Many pro bloggers do both.
6. What happens if my account gets banned?
-
You lose access to earnings, but you can appeal. Prevention is better
than cure → follow policies strictly.
🎯 Final Thoughts
Creating an AdSense account isn’t just about filling a form — it’s
about:
-
Building a quality website or channel.
-
Meeting Google’s strict requirements.
-
Placing ads smartly for best revenue.
-
Scaling with SEO and diversification.
👉 Treat AdSense as a business, not a side hustle. The more effort
you put into content quality, audience growth, and optimization, the more
rewarding it becomes.


No comments: